
If you are here for the first time, scroll down to see Broken China Mosaics (Part 1)
The coolest thing about these nippers is that you can cut out the design the way you want it. You have the control that you just don't get with other cutters.

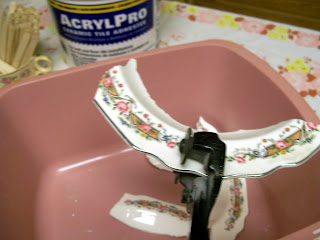
The above photo shows how you can place the wheels in the white space between the patterns.


I've made the first cut (above) as you can see in the bottom of the pan. I cut it large and will continue cutting large cuts until I get off all of the rim. Then I will discard what I don't want and work on cutting the rims into workable pieces and that will lay flat.
Now I'm cutting the large piece in half. And then will cut from there into smaller workable tiles.

And now I cut right under the pattern to remove the curve and tidy up the edges.

Above you can see the 2 nice cuts along side the ones yet to be cut. See how simple that was?
Now on to cutting out the pretty center of a plate:

Simply do the same thing; in this case I don't care about the rims so I will just cut it away to get down to the center. But if cutting a plate that you also want the rim, then just cut carefully as described above.


Now I've gotten to the heel so I flip the plate over and cut as close to the heel as possible until I reach the point where I can carefully "jump" the heel and trim it away.


Once the heel is removed, trim around to remove rough edges and to even it out for a perfect, or near perfect circle!

And there it is, cut and ready to use!
Please come back tomorrow for Part 3, the final part. I will show how to place your tiles (cut china) apply thinset and get those tiles nice and level!
Broken China Mosacis (Part 3)
If you are finding these tips helpful, please follow me and tell your friends! Once I've gotten the final post on Broken China Mosaics, I will move on to more Shabby Vintage Talk...Please join me!!
1 comment:
Hi Kristi, I always thought those nipper thingys must be difficult to work with, but you make it look so easy! Nice job! Thanks so much for stopping by my blog today. Hope you enjoyed Pink Saturday!
Post a Comment